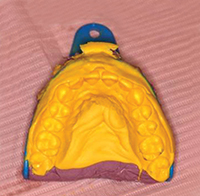
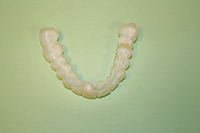
With implants being the fastest growing restorative procedure we have in dentistry, a number of hurdles have presented themselves that we must address to avoid certain pitfalls. The hurdle that will be addressed in this article is the issue of the healing site, post-extraction, and how this plays a crucial role in the aesthetic outcome for implant crowns placed by the restorative dentist. Prefabricated multipurpose restorative appliances (such as Snap-On Smile [DenMat]) (Figure 1) when used properly for implant cases, in both postextraction as well as postimplant placement, can help the clinician prevent the aesthetic failure known as the “black triangle” (Figure 2).
BACKGROUND
The many difficulties associated with implant placement, especially in the anterior region, can cause many cases to fall short of both patient and doctor expectations. The issues that arise can be avoided, but we first must know what we are avoiding:
- Postsurgical recession in the area after extractions can result in longer and unaesthetic teeth due to this receded zone.
- The use of a flipper (acrylic denture) can retard the papilla formation and the black triangle can result after inserting the final crown.
- The length of time a patient may need to wear an interim appliance can cause increasing stress on the treatment of the case. Flippers or unsightly temporary appliances can cause increasing patient anxiety. They are also extremely uncomfortable.
- Aesthetic preview can result in a more comfortable and confident patient that will result in a smooth outcome. Managing the patient is as important as managing the gingival health.
- Using an appliance that can preview the final result is immeasurably important; along with size of teeth, mesiodistally, as well as emergence profile are all extremely important to create a fantastic outcome. Producing an ideal emergence profile with the provisional restoration is critically important. This is because it gives the clinician a road map for the final outcome.The pontic area and the papillae are kept stable and vibrant by the provisional appliance, resulting in a successful and aesthetic final prosthesis.
The previous list of concerns can be negated and minimized with the use of the multipurpose restorative appliance known as Snap-On Smile. When the periodontist and restorative dentist are knowledgeable in the proper use of this provisional appliance, a restorative case that requires extraction, bone grafting, and implant placement can result in a more aesthetic and pleasing final restoration.
The purpose of this article is to educate clinicians on how to fabricate, insert, and adjust (when needed) this class of provisional appliances.
CASE REPORT
Diagnosis and Treatment Planning
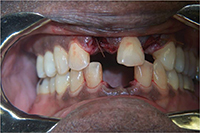
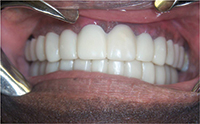
A 60-year-old male patient presented in need of periodontal treatment (Figure 3). Intraoral radiographs showed extensive bone loss in several teeth, both upper and lower arches (Figure 4). The teeth had 2+ mobility with extensive bone loss, deeming them hopeless. The patient’s medical condition was uneventful and was not deemed to be a hindrance in any of the planned dental treatment.
After several treatment planning sessions, it was determined that the patient’s main goal was to save as many teeth as possible. He also wanted to have the ability to function throughout the course of his treatment.
A decision was made between the periodontist and restorative dentist to extract several anterior teeth. These extractions would be accompanied with bone grafts and a provisional appliance that would be used to allow for proper healing. This temporary would be worn a total of almost a full year through the healing phase of the extraction sites, and then during healing after the implants were placed.
Being sensitive to the patient’s desires, we chose to utilize the Snap-On Smile implant provisional appliance. This provisional would be aesthetic and comfortable, allowing the patient to continue to function with confidence. The appliance will not only create the gingival pontic formation, but it will also allow the papillae to maintain its health throughout the entire treatment. A very important aspect to keep in mind when working with an acetyl resin-fabricated appliance is that it is much easier to remove than to add to the appliance. So, if we are not sure that it should extend 2.0 mm or a bit longer, it is best to have a little extra length (3.0 mm, for example) and then to remove some if necessary. Also, be aware that, after adjustment using the Snap-On Smile bur kit, the appliance is easily polished to the same comfort and texture that the appliance was originally received from the laboratory.
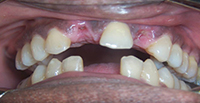
After the appliance was received, an appointment was scheduled with the periodontist to remove several teeth (Figure 5). Although it is not within the scope of this article to elaborate and describe the surgical technique performed by the periodontist, it is essential to know that the Snap-On Smile is inserted immediately after postsurgical extraction and graft placement is carried out. This immediate insertion allows for the tissue to start healing around the polished resin pontic from the onset of the primary healing. This procedure turned out to be a huge success on many levels (Figure 6).
After insertion of the Snap-On Smile provisional appliance, the patient was very satisfied with the aesthetics of the appliance. This is essential on so many levels, as was discussed earlier. It also established proper pontic formation with the preservation of the papillae, which is very important to the aesthetic outcome of this entire treatment plan.
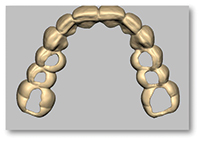 | 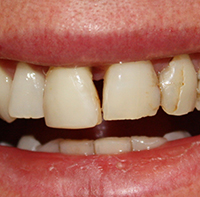 |
| Figure 1. Snap-On Smile Appliance (DenMat). | Figure 2. The dreaded aesthetic nightmare known as the black triangle. |
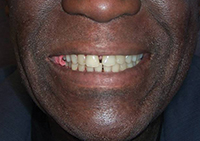 | 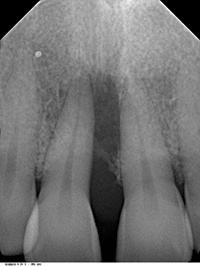 |
| Figure 3. A 60-year-old male patient; visually healthy teeth, but the radiographs show otherwise. | Figure 4. Extensive bone loss and generalized periodontal disease causing need for extraction. |
 | 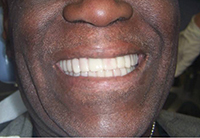 |
| Figure 5. Postsurgical extractions and bone graft placement. | Figure 6. Facial view of the immediate insertion, after extractions of multiple teeth due to extensive periodontal disease. |
A Review of the Clinical Protocol
After the patient accepted treatment, but prior to any treatment at all, impressions were taken to create the upper and lower Snap-On Smile appliances.
A stock tray can be used for both arches. First, the trays were tried-in to make sure they each incorporated the entire dentition in the arch. The impression must envelop the buccal and lingual aspects when inserted into the mouth. After the selection of trays was completed, the impression was then taken using heavy-light body impression technique with 2 vinyl polysiloxane (VPS) materials (SPLASH! [DenMat]; PRECISION [DenMat]). An accurate technique must be employed in order to capture all the anatomic intricacies of the teeth. In this case, the initial step was carried out by placing SPLASH! into the stock tray to create a “custom” tray (Figure 7). After this step, the internal aspect of the tooth compartments of the impression was reemed out slightly (Figure 8) to allow room for the light body material (PRECISION) to be syringed into the “custom” tray that we had created and reseated. This technique allows for an exact impression of the existing dentition that allow the proper fabrication of the Snap-On Smile appliance. The better the impression, the better fit of the appliance! (Figure 9).
After the impressions were completed, a proper bite registration was taken. This is also vital to the success of the procedure for many reasons. A proper bite allows for excellent patient comfort and oral health, especially with an aesthetic appliance that is to replace multiple missing anterior teeth and needs to be worn for an extended period of time. It is optimal to use a rigid and accurate VPS bite registration material (such as MegaBite [DenMat]) to accomplish this important task. After the bite was taken, the clinical aspect of fabricating a Snap-On Smile appliance was complete.
The next phase, the selection of shade and shape, must also incorporate the patient’s opinion. In this particular case, this was an easy step because the patient was 60 years old and he did not want teeth that looked fake and/or too white. The shade A1 was selected to look healthy yet more genuine than a bleaching shade. The manufacturer has a designated shade guide for Snap-On Smile, so we can show our patient the exact shade in which this acetyl resin appliance will be fabricated.
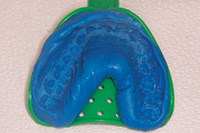 | 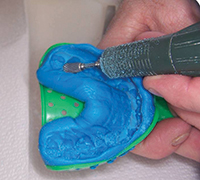 |
| Figure 7. Using a heavy body material with a stock tray, we start the initial process for making the provisional appliance. | Figure 8. Creating a “custom” tray using the heavy body to accomplish the task. |
 |  |
| Figure 9. Using light body to gain the nuances of the arch. This enables us to fabricate a perfect-fitting Snap-On Smile. | Figure 10. Pontic tissue surface is usually extended 2 to 5 mm into the extraction site, depending on the case. |
 |  |
| Figure 11. Patient presented one week postoperatively with the Snap-On Smile implant provisional appliance in the mouth. | Figure 12. Tissue shown in the healing phase, at one week postoperatively. Note that the tissue and the papillae were looking healthy. |
In this particular case, as in all cases where we are extracting teeth and using the appliance as an immediate removable partial appliance, we must indicate on the laboratory prescription form which teeth we are extracting as well as how long we want the pontic to extend into the newly created socket. In most of these cases, it is standard procedure to extend the pontic 2 to 3 mm into the socket (Figure 10). This is dependent on the amount of periodontal disease, because this would add to the postsurgical recession of the extraction site. In this particular case, there was extensive disease so we actually asked for almost 4 mm of pontic extension into the surgical site.
The most obvious way to view success of the surgical visit and immediate insertion of the Snap-On Smile is in observing the patient 7 to 10 days postoperatively (Figure 11). This is when we are able to view the tissue forming properly for implant placement; and, unlike a flipper, the Snap-On Smile appliance will not place unwanted stress on the surgical site. As we can see from pictures of the surgical sites one week postoperatively, the sites were well on their way to healing and the papillae were saved (preserved) and intact (Figure 12). This is especially important when dealing with anterior implant cases, so as to avoid the dreaded black triangle effect when we are inserting the final prostheses.
CLOSING COMMENTS
There are many options that clinicians have to provisionalize anterior surgical and implant cases. The technique described in this article utilizes an acetyl resin based appliance that is extremely soft-tissue friendly, placing no pressure on the tissue itself, has retention that is completely toothborne, and the long-term provisional appliance allows excellent healing throughout the procedure.
Dr. Liechtung graduated from The University of Pennsylvania School of Dental Medicine in 1986. After graduation, he attended the prestigious Advanced Restorative and Implant fellowship at the University of Pennsylvania, which he completed in 1987. Dr. Liechtung has practiced in New York City for many years, during which time he has acquired a vast amount of experience in restorative and cosmetic dentistry. That experience has enabled him to invent the multipurpose restorative appliance known as the Snap-On Smile. Dr. Liechtung has lectured internationally and has published more than 50 articles pertaining to restorative dentistry, as well as Snap-On Smile. Dr. Liechtung has always had the belief that a comprehensive oriented group practice is the best way to fulfill the needs of his patients; therefore, he has gathered what he believes is an extraordinary group of dentists, both cosmetic and restorative, as well as specialists who practice together at Manhattan Dental Arts and deliver optimum care to all patients. He can be reached at (212) 247-2330, at info@manhattandentalarts.com, or at manhattandentalarts.com. Marc Liechtung, DMD is also the founder of Manhattan Dental Arts and the Inventor of the Snap-on-Smile®. Manhattan Dental Arts P.C. is located on the Upper West Side at 68th and Broadway. We specialize in dental cleanings,emergency dentistry, dental implants, all-on-4 dental implants, full mouth reconstruction, dental crowns, root canals,periodontics, Snap on Smile, dental bridges, dentures, extractions, smile makeovers and all forms of general and cosmetic dentistry. If you are looking for an emergency dentist in NYC then we offer free consultations. The practice group also owns Kew Gardens Dental Arts, a dental practice in Queens offering dental implants in Queens, emergency dentistry in Queens, teeth cleaning in Queens, dental crowns, dental bridges and all forms of cosmetic and general dentistry. If you are looking for a periodontist in Queens we offer all gum disease treatments at our practice for patients with all types of gum disease.
Disclosure: Dr. Liechtung reports no disclosures.
Comments